Go Open Source...

Go Open Source...

Monday, December 29, 2014

Shift + Number Keys Not Giving Expected Symbols

Posted By: Saurabh Deochake - 3:35:00 PM


The Problem

It can surely be annoying when you are about to send a tweet and started typing the hash tags by using "Shift" and "Number 3" key on the keyboard and you don't see "#" symbol. While it is supposed to make a "#" symbol, all you see is a "." or "&". It may happen that all other combinations of "Shift" and Number Keys are messed up.

But, before you think something is wrong with your keyboard and decide to change it, have a look at the simple solution to the problem below.


The Solution

The problem does not lie in your keyboard but the problem arose while you were typing. It may happen that by mistake and unknowingly you pressed left "Alt" and "Shift" key and you changed the input language of the keyboard. This can happen when your system has more than one input language set. Follow the steps below to solve the problem.
  1. Go to the Control Panel and locate "Clock, Language and Region" options
    Control Panel
  2. Click on "Change keyboards or other input methods" and Click "Keyboards and Languages" tab

    Change Input Languages
  3. Click on "Change keyboards" tab and Select "English" as your default input language.

    Add English as Default Input Language
  4. You may want to remove all other input languages except English. To do this, click on the input language and click "Remove" button to the right. Do this for all unwanted input languages.
And that's it! Your problem is solved! Always remember the shortcut to change the input languages, which is left "Alt" and "Shift" key!

[Solved] LXC: not authorized to change the password

Posted By: Saurabh Deochake - 2:43:00 PM


The Problem

This problem occurs especially when LXC Containers are run on a host machine with CentOS distribution. When we want to create an user inside the container, we get an error which says "..... is not authorized to change the password of <user_name>. A snippet of the error is shown below:
~]# passwd testuser

passwd: unconfined_u:unconfined_r:unconfined_t:s0-s0:c0.c1023 is not authorized to change the password of testuser

Containers Abstract Image

The Solution 

The culprit behind this problem usually is SELinux. When set to "Enforcing" or "Permissive", the SELinux would deny the user to change user parameters inside the containers like passwords as we encountered in the problem. Though, it is not safe to disable SELinux; we can solve above problem temporarily by checking the status of SELinux and disabling it. To get the "passwd" command work inside the container, follow the steps below:

1. Check SELinux settings on CentOS Host Machine
~]$ sestatus
SELinux status:                 enabled
SELinuxfs mount:                /selinux
Current mode:                   enforcing
Mode from config file:          enforcing
Policy version:                 24
Policy from config file:        targeted
2. Check SELinux settings on Guest
~]$ sestatus
SELinux status:                 enabled
SELinuxfs mount:                /selinux
Current mode:                   enforcing
3. Disable SELinux from Config file
  1. Go to the config file located at /etc/selinux/config 
  2. Change SELINUX option to disabled 
  3. Save and close the file
4. Reboot the Host Machine
5. After reboot, check SELinux setting parameter using getenforce
~]$ getenforce
Disabled
Now, check again if the problem still persists in the guest virtual machine. This temporary fix should solve the problem.
    *Note: This is only a temporary fix to the problem. If you want to have more insight on the problem and patches to fix the internal problems in LXC (if any), please post your queries to "lxc-users" mailing list here.

    Saturday, December 27, 2014

    Upgrade Sony Xperia S to Android 5.0 Lollipop: A Step-by-Step Guide

    Posted By: Saurabh Deochake - 12:17:00 PM


    Every phone has a finite life when it comes to firmware updates. Sony Xperia S, Sony's once flagship Android smartphone was launched in February 2012 with Android 2.3 Gingerbread and offered an upgrade to Android 4.1 Jellybean. In February 2014, Sony confirmed that a number of its smartphones will "not receive any further software upgrade support". The phones which are no longer supported for software upgrade are between 18 months and two years old which also included Xperia S and its twin smartphone Xperia SL. Many Xperia S users would want to keep their smartphone up-to-date with the latest OS and firmware by rooting their devices. In this post, we will discuss step-by-step process to upgrade your Xperia S to the latest Android 5.0 Lollipop with the help of custom ROM firmware.

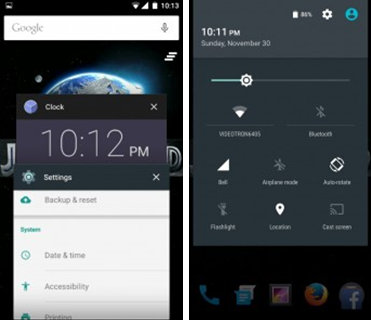
    Android 5.0 Lollipop Sample Screens

    Key Features of Android 5.0 Lollipop

    • 4x performance improvements
    • Faster and more powerful computing
    • Supported on ARM, x86 and MIPS architectures
    • Full 64-bit compatibility
    • Improved A/V Sync
    • More intelligent notification system
    • Support for OpenGL ES 3.1 with Android Extension Pack (AEP)
    • New types of Sensors: Tilt Sensors and Heart Rate Sensors
    • Improved battery saver feature for better and efficient power management
    Before we start with our procedure to update the system to Android 5.0 Lollipop, please go through some important pre-requisites given below:

    Pre-requisites 

    • Backup all the data in your Xperia S including SMS, Call Log, Contacts, All multimedia files and other important local files. Failure to backup it would result in loss of important data in your cellphone.
    • Make sure your smartphone battery is charged up to at least 80%
    • Enable USB Debugging Mode from Settings option.
    • Make sure that your smartphone is rooted.

    Updating Xperia S to Android 5.0 Lollipop

    1. Install ROM Manager App on your Xperia S. You can get this app from Google Play Store here.
    2. Install clockwork mod recovery.
    3. Download the Android 5.0 ROM from the link below:
      1. Part 1: http://goo.gl/7pyL97
      2. Part 2: http://goo.gl/ffHU2x
      3. Part 3: http://goo.gl/l1zKh5
    4. Combine 3 parts of custom ROM into 1 file using WINRAR.
    5. Connect your Xperia S to PC via original USB Cable. Copy downloaded consolidated ROM file to SD card.
    6. Using ROM Manager, restart your cellphone in the recovery mode. Once your cellphone gets into Recovery Mode, select Backup/Restore option in the ROM Manager to backup your information.
    7. Perform a total data erase, including Delvik Cache from the Recovery Menu. Once completed, in the Recovery Menu, click on Flash ROM from SD Card. 
    8. Navigate to the location of downloaded ROM file and follow the instructions to install Android 5.0 Lollipop on your smartphone.
    9. Once the installation is completed, reboot your Xperia S. 
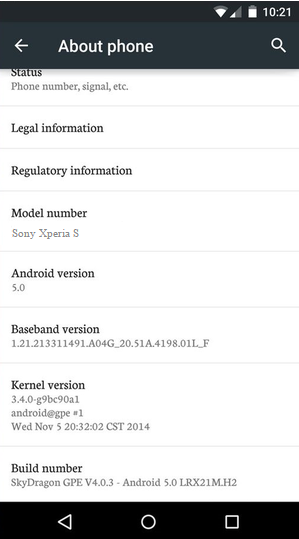
    Updated System Information

    Congratulations! You've just upgraded your Xperia S to Android 5.0 Lollipop.

    Note: If your smartphone gets stuck while booting during the installation, perform the wipe cache partition and dalvik cache before rebooting the smartphone.


    Friday, December 26, 2014

    Libvirt: In a Nutshell

    Posted By: Saurabh Deochake - 9:40:00 PM


    In one of the previous posts, we discussed about lightweight virtualization solutions and more specifically, Linux Containers aka. LXC. Although, LXC has its own management tools that are shipped with the package, there are other APIs and virtual machine managers which can be used to manage various hypervisors and container systems. In this post, we discuss about Libvirt, a widely popular open source virtual machine management API.

    What is Libvirt?

    Libvrit is an open source API, daemon and virtual machine manager for managing platform virtualization. Libvirt can be used to manage various virtualization solutions like LXC, KVM, OpenVZ, Xen and VMware ESX. Libvirt is a C Library, but it offers bindings in other languages some of which are Python,Perl, Ruby and Java.  

    Some of Hypervisors Supported by Libvirt

    Supported Hypervisors

    Libvirt Supports a multitude of hypervisors and virtualization solutions. Some of widely known hypervisors supported by Libvirt are:
    1. LXC- Linux Containers
    2. OpenVZ
    3. QEMU/KVM
    4. Xen Hypervisor
    5. VirtualBox
    6. VMware ESX and GSX Hypervisors
    7. Microsoft's Hyper-V Hypervisor
    8. IBM's PowerVM for AIX

    Command Line Tools

    Libvirt comes with a plethora of tools for management purposes. These tools range from virtual machine management to file system management, from memory management to provision of virtual machines over the network. Some of important command line tools that are used are:
    • virsh: An interactive shell and a virtual machine management tool which comes shipped with core distribution of Libvirt. It is one of the most important tool when it comes to managing various tasks on domains like virtual machines, containers or storage managed by Libvirt. 
    • virsh-top: Another interactive command line utility to keep track of CPU, memory, disk and network utilization of all the virtual machines running on a host machine. This utility is essentially similar to "top" command which provides an ongoing look at processor activity of host machine.
    • virt-what: A shell script essentially used for detecting if the program is running on the virtual machine.
    • virt-df: Another commond line utility which is similar in working with that of Linux file system command, "df". This utility offers the file system information of all virtual machine running on the host machine. This utility gives the information about how much disk space is used in each of guest disk.
    • virt-clone: This tool allows disk image(s) and configurations to be cloned from one virtual machine to another. This tool comes in handy especially while creating a new virtual machine from existing virtual machine keeping disk configurations intact. It automates copying of data across to new disk images, and updates the UUID, MAC address, and name in the configuration.

    Get Libvirt

    Libvirt is an open source software and released under the GNU Lesser General Public License (see the file COPYING.LIB in the distribution package for the precise wording). You can get Libvirt from the latest upstream tarballs from hereYou can also get it using git clone from git clone git://libvirt.org/libvirt.git.

    Friday, February 21, 2014

    LXC: In a Nutshell

    Posted By: Saurabh Deochake - 11:12:00 PM


    What is LXC?

    LXC (LinuX Containers) is an operating system-level virtualization method for running multiple isolated Linux systems (containers) on a single control host. LXC provides operating system-level virtualization not via a 
    full blown virtual machine, but rather provides a virtual environment that has its own process and network space. LXC is an userspace API which supports Linux Kernel's support for containment.
    With containers, you have the option of kicking off any individual process you like inside any container. Instead, what we do is set up a file system containing a copy of a minimal operating system image, and kick off /sbin/init on that partition, in that file system, with its own Ethernet interface. We get the appearance of a VM, each container getting its own IP address, and disk file systems, its own set of software packages installed, and its own set of OS daemons processes.

    Linux Container(?)

    Features

    LXC provides following features of Linux Kernel to support containment:
    1. Chroots
    2. Control groups (cgroups)
    3. Kernel namespaces (ipc, uts, mount, pid, network and user)
    4. Apparmor and SELinux 
    5. Kernel capabilities and many more...

    chroot and LXC

    In simple words, LXC builds up from chroot to implement complete virtual systems, adding resource management and isolation mechanisms to Linux’s existing process management infrastructure. LXC is often considered as a virtualization solution between chroot on steroids and complete full blown virtual machine.  The main goal of LXC is to create a closest possible environment as that of a standard Linux installation but without the need for a separate kernel. 

    Container Life Cycle

    When the container is created, it contains the configuration information. When a process is launched, the container will be starting and running. When the last process running inside the container exits, the container is stopped.

    Container Life Cycle
    In case of failure when the container is initialized, it will pass through the aborting state.

    Components

    The current release of LXC is comprised of following main components:
    • The liblxc library
    • Several language bindings (python, ruby, lua etc.)
    • Standard tools to control the containers
    • Container templates

    Container Management

    The containers can be managed with the help of some popular container-management utilites like lxc-tools and other libraries like libvirt. Libvirt is an open source API, daemon and management tool for managing platform virtualization. 

    Get LXC

    LXC is free software and is released under the terms of the GNU LGPLv2.1+ license. You can get LXC from the latest upstream tarballs from here or directly from git repository of LXC from here. You can also get it using git clone from git clone git://github.com/lxc/lxc.

    Saturday, February 15, 2014

    [Solved] Virtualbox: Could not mount the media/drive

    Posted By: Saurabh Deochake - 9:47:00 AM


    VirtualBox comes with some software packages but they are meant to be installed inside the Virtual Machine to improve the performance of guest OS and add extra features like mouse pointer integration, shared folders, better video support, time synchronization, shared clipboard, drag'N'drop and so on. These packages shipped in an iso image file which you can find at VirtualBox installation location.

    Problem

    Many times while installing the virtualbox, we encounter an error like "Could not mount the media/drive" with error flag as "VERR_PDM_MEDIA_LOCKED".

    VBoxGuestAdditions Error

    Solution

    The trick to solve this problem is really simple. Follow the below steps:
    1. Shut down the guest OS.
    2. Now in VM Manager click the relevant VM and click "Settings" tab.
    3. Go to "Storage" menu.
    4. In "Controller: IDE" section, locate the attachment "VBoxGuestAdditions.iso"
    5. Right Click on the attachment "VBoxGuestAdditions.iso" and select "Remove Attachment". In the confirmation dialog box, click "Remove".

    6. Now in the same "Controller: IDE" section, locate the little CD symbol.

                             
    7. In a dialog box asking to add a virtual CD/DVD disk, select "Leave Empty".

                             
    8. Click "OK" and start the VM.

      Now you should be able to install the VirtualBox Guest Additions inside the VM.
          

    Wednesday, February 12, 2014

    Cgroups: In a Nutshell

    Posted By: Saurabh Deochake - 12:18:00 PM


    What is Cgroups?

    Cgroups is a Linux kernel feature to limit, account and isolate resource usage of process groups. Cgroups allow you to allocate resources—such as CPU time, system memory, network bandwidth, or combinations of these resources—among user-defined groups of tasks (processes) running on a system. You can monitor the cgroups you configure, deny cgroups access to certain resources, and even reconfigure your cgroups dynamically on a running system. 


    The above figure describes the CPU shares limitation using Cgroups. We can see that three Cgroups use chunks of CPU. Cgroup #1’s share is 1024. Cgroup #2’s share is greater than both other Cgroups, so it’ll get more CPU than both others. Cgroup #3 will get least CPU share.

    Subsystems of Cgroups:

    Other than CPU subsystem, there are eight other subsystems available. Let’s have a look at all the Cgroups subsystems in brief:

    • blkio — this subsystem sets limits on input/output access to and from block devices such as physical drives (disk, solid state, USB, etc.).
    • cpu — this subsystem uses the scheduler to provide cgroup tasks access to the CPU.
    • cpuacct — this subsystem generates automatic reports on CPU resources used by tasks in a cgroup.
    • cpuset — this subsystem assigns individual CPUs (on a multicore system) and memory nodes to tasks in a cgroup.
    • devices — this subsystem allows or denies access to devices by tasks in a cgroup.
    • freezer — this subsystem suspends or resumes tasks in a cgroup.
    • memory — this subsystem sets limits on memory use by tasks in a cgroup, and generates automatic reports on memory resources used by those tasks.
    • net_cls — this subsystem tags network packets with a class identifier (classid) that allows the Linux traffic controller (tc) to identify packets originating from a particular cgroup task.
    • net_prio — this subsystem provides a way to dynamically set the priority of network traffic per network interface.
    • ns — the namespace subsystem.

    Features:

    Now, let’s discuss about features provided by Cgroups. 
    Cgroups provides following features:
    • Resource Limitation: Groups can be set to not exceed a resource limitation. This limitation includes memory limit, file system cache limit, disk I/O throughput limitation etc.
    • Prioritization: Some groups may get a larger share of CPU, disk I/O throughput etc.
    • Accounting: We can measure how much resources certain systems use.
    • Isolation: Separate namespaces are provided for groups, so they remain fully exclusive to each other. The groups cannot see each other’s processes, network connections etc.
    • Control: We can freeze groups, checkpoint and restart the container. 
    Today, I briefly discussed about Cgroups. Next time, we'll discuss about a buzzing virtualization solution in the Open Source Community, Linux Containers (LXC).

    Sunday, February 9, 2014

    Fedora 21 will be Nameless

    Posted By: Saurabh Deochake - 8:22:00 PM


    Red Hat owned and community-supported Fedora Project developed "Fedora 21" has always had some funky and colorful names. After the Fedora 20 release was named Heisenbug, the next release Fedora 21 will not have any name.  Fedora 19 was called Schrodinger's Cat, Fedora 18 was the Spherical Cow, and Fedora 17 was the Beefy Miracle.


    Jaroslav Reznik of Red Hat in his blog post says,
     “What will be the code name for Fedora 21. And again short answer: null. Not null as null string but null. Fedora Board decided to end release names process. It does not mean “no more release names” but it’s up to community or working groups, if anyone wants to step into the role of Name Wrangler and helps running this process. Or reform it in any way.”

    Late Release of Fedora 21

    A version of Fedora has a relatively short life cycle—the maintenance period is only 13 months: there are 6 months between releases, and version X is supported only until 1 month after version X+2. Typically, the Fedora project has had two releases in any given year: one in the early spring, the other early winter. For 2014, that likely won't be the case. 
    Jaroslav Reznik further answers about the schedule of Fedora 21, 
    "Is Fedora 21 going to be released in the old model way, or new one? Hard to answer right now. But there's one date - F21 is not going to be released earlier than in August (and I'd say late August)". 
    There has been a discussion about Fedora 21's release schedule.

    The time gap between Fedora 20 and Fedora 21 should be approximately 6 months. The time between the two releases will be used to work on tooling for quality control and release automation. But this is not the case this time. Jaroslav Reznik further says,
    “But this time we are in a bit different situation – there are several working groups trying to redefine, how Fedora should look like in the future and it does not make sense to create schedule. We need resolution from this effort. It’s planned for January.”

    2014 will be an exciting year in the Red Hat community, beyond just the evolution of Fedora. Red Hat Enterprise Linux 7 will likely be announced at some point in this year. Moreover, Red Hat recently partnered with its community developed CentOS community Linux project. CentOS is a clone of Red Hat's Red Hat Enterprise Linux (RHEL) platform, and provids a free alternative to Red Hat's RHEL.

    Creative Commons License
    This blog by Linuxys is licensed under a Creative Commons Attribution-NonCommercial-ShareAlike 4.0 International License.

    Copyright © 2015 Linuxys™ All rights reserved.

    Designed by Templateism. Hosted on Blogger Platform.