Go Open Source...

Go Open Source...
Showing posts with label Windows. Show all posts

Thursday, January 22, 2015

How To Use WhatsApp On Your Computer Using WhatsApp Web

Posted By: Saurabh Deochake - 5:29:00 PM


WhatsApp Web

Today, the popular instant messaging service WhatsApp launched the web version of its Android and iOS app. The client service is named as WhatsApp Web. As said by the company, the web client is simply an extension of your phone. The web browser mirrors conversations and messages from your mobile device - this means all of your messages still live on your phone. The company also says that unfortunately for now, they will not be able to provide web client to iOS users due to Apple platform limitations.


How to Get WhatsApp Web Working

To get WhatsApp Web working on your computer, follow the below steps:
  1. Currently, WhatsApp Web works only on Google Chrome. If you do not have Google Chrome browser installed on your computer. Download the browser from here and install it on your computer.
  2. Download the latest version of WhatsApp from the Google Play Store
  3. Now, go to your computer and open https://web.whatsapp.com in Google Chrome browser (only works in Google Chrome). You should see a QR code.
  4. Next, go to the WhatsApp app installed on your cellphone and press menu/right click on your phone, you will see WhatsApp web option.
  5. Select WhatsApp Web option and scan the QR code using your rear camera.
  6. That's it. It will automatically sync with WhatsApp servers and display all of your messages.
Screenshot of WhatsApp Web Client on Chrome


We think that it's an innovative way to control all your WhatsApp messages on your phone while working on your computer without touching your phone every now and then and typing on the tiny keypad of your smartphone.

(Also Read: How to use WhatsApp with Internet connection.)

How did you find WhatsApp's new web-based chat client? Do let us know in comments below.


Monday, January 12, 2015

Top 5 Less Known Features of VLC Media Player

Posted By: Saurabh Deochake - 9:43:00 PM


Now, if you ask anybody which media player would they prefer to play their multimedia files, a majority of answers would be VLC Media Player. VLC is one of the most widely used multimedia player worldwide. It is a portable, cross-platform and (thankfully!) a free open-source software released by VideoLAN. Although VLC is used on millions of devices across the world, there are a few less known and less used features of VLC. Here, in this post we give you top 5 less known features of VLC Media Player. 

1) VLC as a YouTube Video Downloader

We all know that VLC Media Player can be used to stream the videos using Open Network Stream option. Sometimes we want to download YouTube videos but we cannot, of course unless we have a YouTube downloader software installed on the device. Surprisingly, VLC can also be used as a YouTube video downloader eliminating the need to download all those one-click video downloader and browser extensions to download our favorite YouTube videos. 

Follow the steps to download YouTube videos using VLC:
  1. Go to Media -> Open Network Stream and paste the URL of the YouTube video that you intend to download.

  2. Click Play and when VLC starts playing the video, go to Tools ->Codec Information and copy the Location URL and paste the URL in your browser.

  3. Click Play to play the video in browser. Once the video starts playing, right click on the video and Click Save As to download the video.

2) VLC as a File Converter 

Yes! You've read VLC as a file converter! We can use VLC media player as a tool to convert multimedia files from one format to another. Gone are those days when we had to download multimedia file converter software. 

Follow the steps to convert files using VLC:
  1. Go to Media -> Convert / Save.
  2. In Open Media prompt, click on Add to add the files that you need to convert.

  3. Click on Convert / Save. In Convert pop up window, select the file type your original file to be converted from wide range of options in Profile.
  4. Write the location of the destination file and click Start. After the conversion process is finished. You can check your converted file at the "destination location".

3) VLC as an Online Video Chat Recorder

Apart from playing multimedia files, another awesome use of VLC media player is to record your online video chats. 

Follow the steps to record your online video chat sessions using VLC:
  1. Go to Media -> Open Capture Device

  2. On Open Media pop up window, select Webcam option and Microphone option from Video device name and Audio device name drop down boxes, respectively.
  3. Drop down the Play button which opens the Convert pop up window where you can select the Destination file, click on the Browse button to select video file location, name and format.

4) VLC as an Audio Normalizer

When you are playing audio and video files and a sudden increase in the volume jars your ears, it’s a feature to keep in mind. In case of video, you have to restart the video for it to take effect. Go to Preferences -> Audio and select normalization levels from Normalize volume to option.

5) VLC as a Tool to Play Videos in ASCII Art

Another cool feature which is less common feature is playing videos in ASCII art. Yes! You can use VLC player to play videos in ASCII text. To play videos in cool ASCII text, go to Preferences -> Video and select Color ASCII art video output from Output drop down menu.


Now, play any video file and enjoy it watching in cool ASCII text.

Got any more lesser known features of awesome VLC Media Player that are not listed here? Please share them in comments below.

Wednesday, January 7, 2015

Top 5 Free Alternatives to Adobe Photoshop

Posted By: Saurabh Deochake - 9:49:00 PM


Adobe Photoshop has been one of the most widely known picture editing software for some years now. It has become so dominant that we use its name as verb. If you want to get your hands on Photoshop, you will have to spend around $50 for complete package. The best thing about Open Source Software Communities is that many people work hard to build free alternatives to expensive commercial products. In this post, we give you top 5 alternatives to Adobe Photoshop which are absolutely free.

1. GIMP (Win/Linux/OS X)

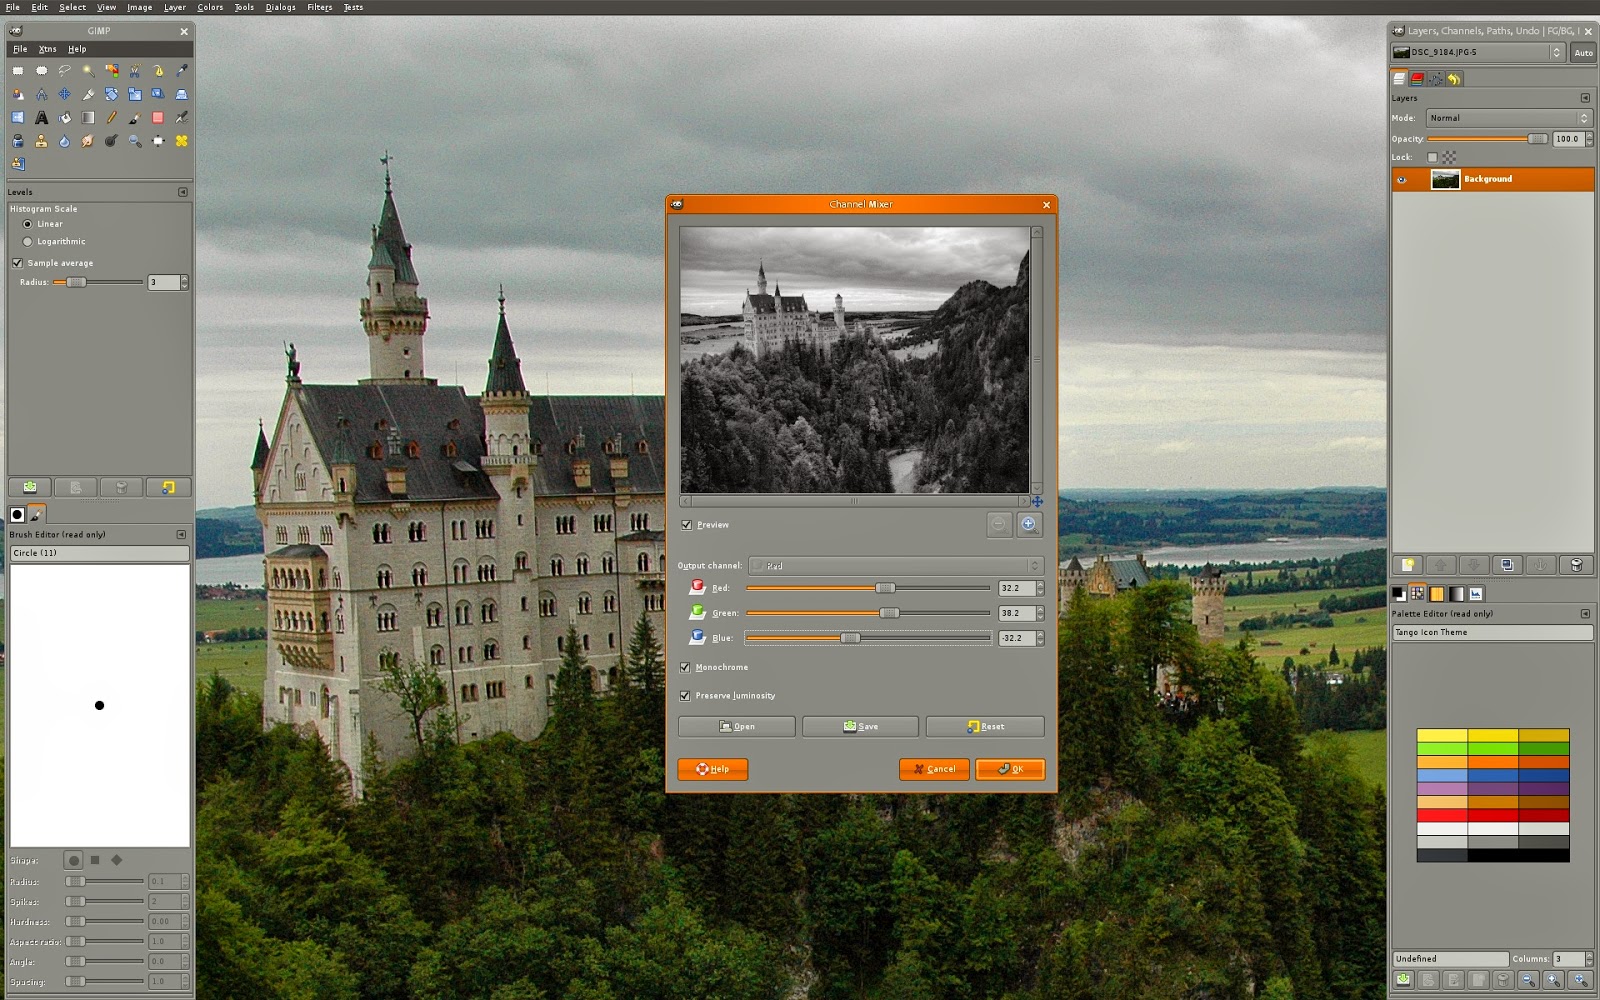
Whenever we hear about an alternative to Photoshop, one program that comes to our mind is GIMP. GIMP (GNU Image Manipulation Program) is a freely distributed image editing software used for tasks such as photo retouching, image composition and image authoring. It can be used as a simple paint program, an expert quality photo retouching program, an online batch processing system, a mass production image renderer, an image format converter, etc. GIMP is designed to be augmented with various plug-ins and extensions to carry out everything from the simplest task to the most complex tasks.
GIMP Linux Distribution
One can be a little bit bewildered with a lot of features and tools that come shipped with GIMP. Fortunately enough, it does not take a long for a newbie to get familiar with GIMP and its features. Additionally, there is a multitude of tutorials of GIMP to make you more familiar with the software.

How to get it?

GIMP is available on both Windows and Linux. One important thing to note is GIMP does not work on all the Windows operating system before Windows XP. You can download GIMP here.

2. Pixlr Express (Web/Android)

Now, Pixlr Express is one of the most impressive photo editing software launched by Autodesk Inc. Pixlr is a web-based online photo editing service which is now made available on the Windows desktop and Mac computers. The software comes with a plethora of cool features like Blur, Liquify, Heal, Smooth and Focal Blur. One can always customize the image with advanced features like adding the border, stickers and text with some impressive font styles. Pixlr Express is not just one of the best online image editors, but one of the best Web-based and Android applicatons.

Pixlr Express Effects Panel

How to get it?

Best thing of Pixlr Express is that it is available on Windows, Mac and Android platforms making it one of the most popular applications in the market of image processing. Check your platform and see where can you get Pixlr Express from:
  • Windows and Mac: Get Pixlr Express from here.
  • Android: Get Pixlr Express app on Google Play Store from here.

3. Paint.Net (Windows)

Another freely distributed image processing software, Paint.Net is widely acclaimed by popular websites like CNET, Lifehacker and PC World. It started as an undergraduate college design project which eventually became one the most popular free picture editing software. Paint.Net features layer support, and a useful list of effects which can be used to accomplish wide range of picture manipulations from simple picture editing to a complex rendering tasks. Paint.Net also supports a wide range of plug-ins created by community to carry out specific advanced tasks.
Paint.Net Editing Tools Screenshot
With a simple menu and tool box, it's certainly one of the most human-friendly Photoshop alternatives available. An advanced user seeking to get his hands on Paint.Net may get disappointed as it doesn't have too many top-end features.

How to get it?

One disadvantage of Paint.Net is that it is made to work only on Windows platform (sorry Mac and Linux users!). To add to that minimum system required to run Paint.Net as per their website must run Windows 7 (Service Pack 1) and above. Another important thing to note is this software does not work on the Windows RT operating system. You can download Paint.Net from here.

4. PicMonkey (Web)

PicMonkey is the best alternative to Picnik Photo Editor which was shut down by Google and quickly merged into Google+ by the name Google+ Photo Editor. After Picnik was shut down by Google, two former Picnik engineers, Brian Terry and Justin Huff founded PicMonkey in April 2012. The online application to edit the pictures is very much simple. All you have to do is upload the image you want to edit, but once you're in you have a pile of different tools to use. Shapes, textures, and text can be added with a couple of clicks, and there are some cool effects to play around with too.
 
PicMonkey Editor Screenshot
Although PicMonkey does not provide tools and features that are provided with Photoshop, but it comes with ample effects and tools to give you Photoshop-esque look to your pictures.

How to get it?

Being a web-based photo editing application, PicMonkey can be used on all operating systems. Another impressive thing about PicMonkey is that it is also available on Google Chrome Store as an extension for Google Chrome browser. Check your platform and see where can you get PicMonkey from:
  • Windows/OS X/Linux- Get PicMonkey from here.
  • Google Chrome Extension- Get PicMonkey extension for Chrome browser from here.

5. Sumo Paint (Web)

Sumo Paint is an online image editor and an impressive web-based alternative to Photoshop. You can edit your photos without need to install anything to your device. It's one of the most versatile photo editor and painting application that works in a browser. You can open and save images from your hard drive or save it to cloud. Sumo Paint supports some advanced features like Layers, Texture, Fractals and so on. 
Sumo Paint Photo Editor Screenshot
Being a web-based photo editing application, Sumo Paint can be used on all operating systems. Like PicMonkey, Sumo Paint is also available on Google Chrome Store as an extension for Google Chrome browser. Check your platform and see where can you get Sumo Paint from:
  • Windows/OS X/Linux- Get Sumo Paint from here.
  • Google Chrome Extension- Get Sumo Paint extension for Chrome browser from here.
Those are our top 5 picks, but definitely there are other applications out there. Got a favorite that we didn't mention? Share it below!

Monday, December 29, 2014

Shift + Number Keys Not Giving Expected Symbols

Posted By: Saurabh Deochake - 3:35:00 PM


The Problem

It can surely be annoying when you are about to send a tweet and started typing the hash tags by using "Shift" and "Number 3" key on the keyboard and you don't see "#" symbol. While it is supposed to make a "#" symbol, all you see is a "." or "&". It may happen that all other combinations of "Shift" and Number Keys are messed up.

But, before you think something is wrong with your keyboard and decide to change it, have a look at the simple solution to the problem below.


The Solution

The problem does not lie in your keyboard but the problem arose while you were typing. It may happen that by mistake and unknowingly you pressed left "Alt" and "Shift" key and you changed the input language of the keyboard. This can happen when your system has more than one input language set. Follow the steps below to solve the problem.
  1. Go to the Control Panel and locate "Clock, Language and Region" options
    Control Panel
  2. Click on "Change keyboards or other input methods" and Click "Keyboards and Languages" tab

    Change Input Languages
  3. Click on "Change keyboards" tab and Select "English" as your default input language.

    Add English as Default Input Language
  4. You may want to remove all other input languages except English. To do this, click on the input language and click "Remove" button to the right. Do this for all unwanted input languages.
And that's it! Your problem is solved! Always remember the shortcut to change the input languages, which is left "Alt" and "Shift" key!

Saturday, February 15, 2014

[Solved] Virtualbox: Could not mount the media/drive

Posted By: Saurabh Deochake - 9:47:00 AM


VirtualBox comes with some software packages but they are meant to be installed inside the Virtual Machine to improve the performance of guest OS and add extra features like mouse pointer integration, shared folders, better video support, time synchronization, shared clipboard, drag'N'drop and so on. These packages shipped in an iso image file which you can find at VirtualBox installation location.

Problem

Many times while installing the virtualbox, we encounter an error like "Could not mount the media/drive" with error flag as "VERR_PDM_MEDIA_LOCKED".

VBoxGuestAdditions Error

Solution

The trick to solve this problem is really simple. Follow the below steps:
  1. Shut down the guest OS.
  2. Now in VM Manager click the relevant VM and click "Settings" tab.
  3. Go to "Storage" menu.
  4. In "Controller: IDE" section, locate the attachment "VBoxGuestAdditions.iso"
  5. Right Click on the attachment "VBoxGuestAdditions.iso" and select "Remove Attachment". In the confirmation dialog box, click "Remove".

  6. Now in the same "Controller: IDE" section, locate the little CD symbol.

                           
  7. In a dialog box asking to add a virtual CD/DVD disk, select "Leave Empty".

                           
  8. Click "OK" and start the VM.

    Now you should be able to install the VirtualBox Guest Additions inside the VM.
        

Creative Commons License
This blog by Linuxys is licensed under a Creative Commons Attribution-NonCommercial-ShareAlike 4.0 International License.

Copyright © 2015 Linuxys™ All rights reserved.

Designed by Templateism. Hosted on Blogger Platform.